which git/usr/bin/gitEVR 628- Intro to Environmental Data Science
The overall flow:
which git/usr/bin/gitgit config -lcredential.helper=osxkeychain
init.defaultbranch=main
user.email=juancarlos.villader@gmail.com
user.name=jcvdav
core.excludesfile=~/.gitignore
filter.lfs.clean=git-lfs clean -- %f
filter.lfs.smudge=git-lfs smudge -- %f
filter.lfs.process=git-lfs filter-process
filter.lfs.required=true
http.postbuffer=157286400
core.repositoryformatversion=0
core.filemode=true
core.bare=false
core.logallrefupdates=true
core.ignorecase=true
core.precomposeunicode=true
remote.origin.url=https://github.com/jcvdav/EVR_628.git
remote.origin.fetch=+refs/heads/*:refs/remotes/origin/*
branch.main.remote=origin
branch.main.merge=refs/heads/main
branch.main.vscode-merge-base=origin/main
pull.rebase=true
branch.dev.remote=origin
branch.dev.merge=refs/heads/dev
branch.test.remote=origin
branch.test.merge=refs/heads/test{EVR628tools}:remotes::install_github("jcvdav/EVR628tools")+” icon in the top righthellow_worldIn RStudio:
README.md and .gitignore filesTo create these folders in your repository:
environmental-data-project/
├── data/
│   ├── raw/
│   ├── processed/
|   └── output/
├── scripts/
│   ├── 01_processing/
│   ├── 02_analysis/
│   └── 03_content/
├── results/
│   ├── img/
│   └── tab/
├── docs/
└── README.md
Use:
EVR628tools::create_dirs()usethis::git_vaccinate()?usethis::git_vaccinate()usethis::git_vaccinate().gitignore file to exclude unnecessary files:# R specific
.Rhistory
.RData
.Ruserdata
*.Rproj.user/
# System files
.DS_Store
Thumbs.dbNote: You can always add specific files with git add -f filename, edit the .gitignore file or use the git pane
scripts/content/EVR628tools# Load packages
library(EVR628tools)✔ ✔ ✔ You sucessfully loaded the EVR628tools package ✔ ✔ ✔library(tidyverse)── Attaching core tidyverse packages ──────────────────────── tidyverse 2.0.0 ──
✔ dplyr 1.1.4 ✔ readr 2.1.5
✔ forcats 1.0.0 ✔ stringr 1.5.1
✔ ggplot2 3.5.2 ✔ tibble 3.3.0
✔ lubridate 1.9.4 ✔ tidyr 1.3.1
✔ purrr 1.1.0
── Conflicts ────────────────────────────────────────── tidyverse_conflicts() ──
✖ dplyr::filter() masks stats::filter()
✖ dplyr::lag() masks stats::lag()
ℹ Use the conflicted package (<http://conflicted.r-lib.org/>) to force all conflicts to become errors# Lod data
data(data_lionfish)
# Create a simple plot
p <- ggplot(data_lionfish,
aes(x = total_length_mm, y = total_weight_gr)) +
geom_point() +
facet_wrap(~site)
p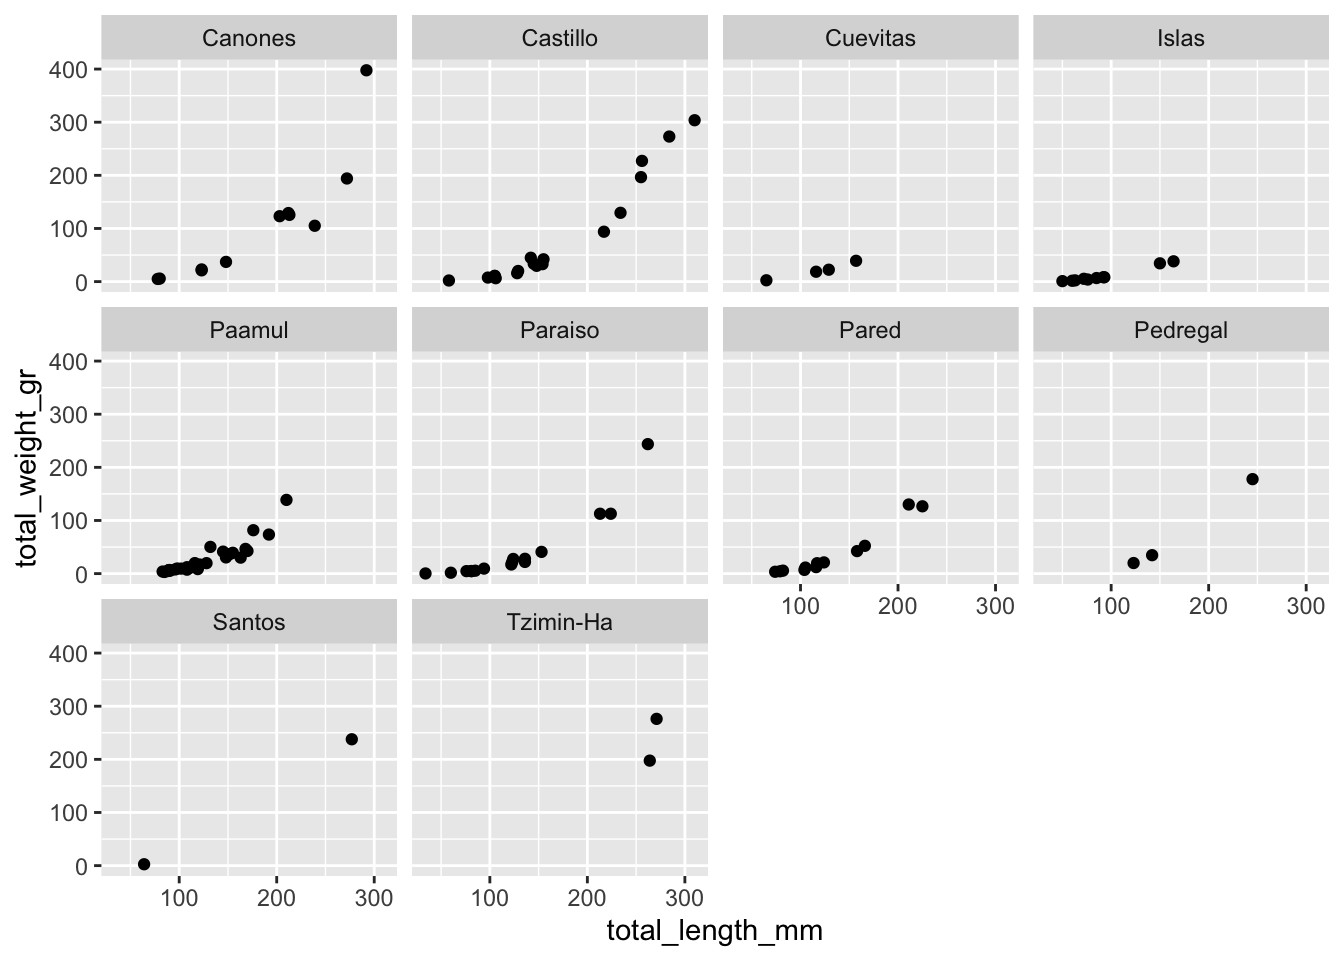
# Save plot
# The above shouldn't work, why?
ggsave(plot = p, filename = "results/figures/first_plot.png")
Error in `ggsave()`:
! Cannot find directory 'results/figures'.
ℹ Please supply an existing directory or use `create.dir = TRUE`.Create a comprehensive README.md
# My first repo

## Description

Analysis of environmental data for EVR 628 course.

## Project Structure

- `scripts/`: R scripts for analysis
- `results/`: Output figures and tables

## Author

[Your Name and email?]… wait …
Changes to make by B:
# Example: environmental_data_analysis.R
library(EVR628tools)
library(tidyverse)

data(data_lionfish)

# Create a simple plot
p <- ggplot(data_lionfish,
            aes(x = total_length_mm, y = total_weight_gr,
                ### B adds color by depth
                color = depth_m)) +
  geom_point() +
  facet_wrap(~site) +
  ### B modifies default colors
  scale_color_gradientn(colors = palette_IPCC(var = "prec", type = "seq")) +
  ### B adds labels
  labs(x = "Total length (mm)",
       y = "Total weight (mm)",
       color = "Depth (m)") +
  ### B adds theme
  theme_bw()

p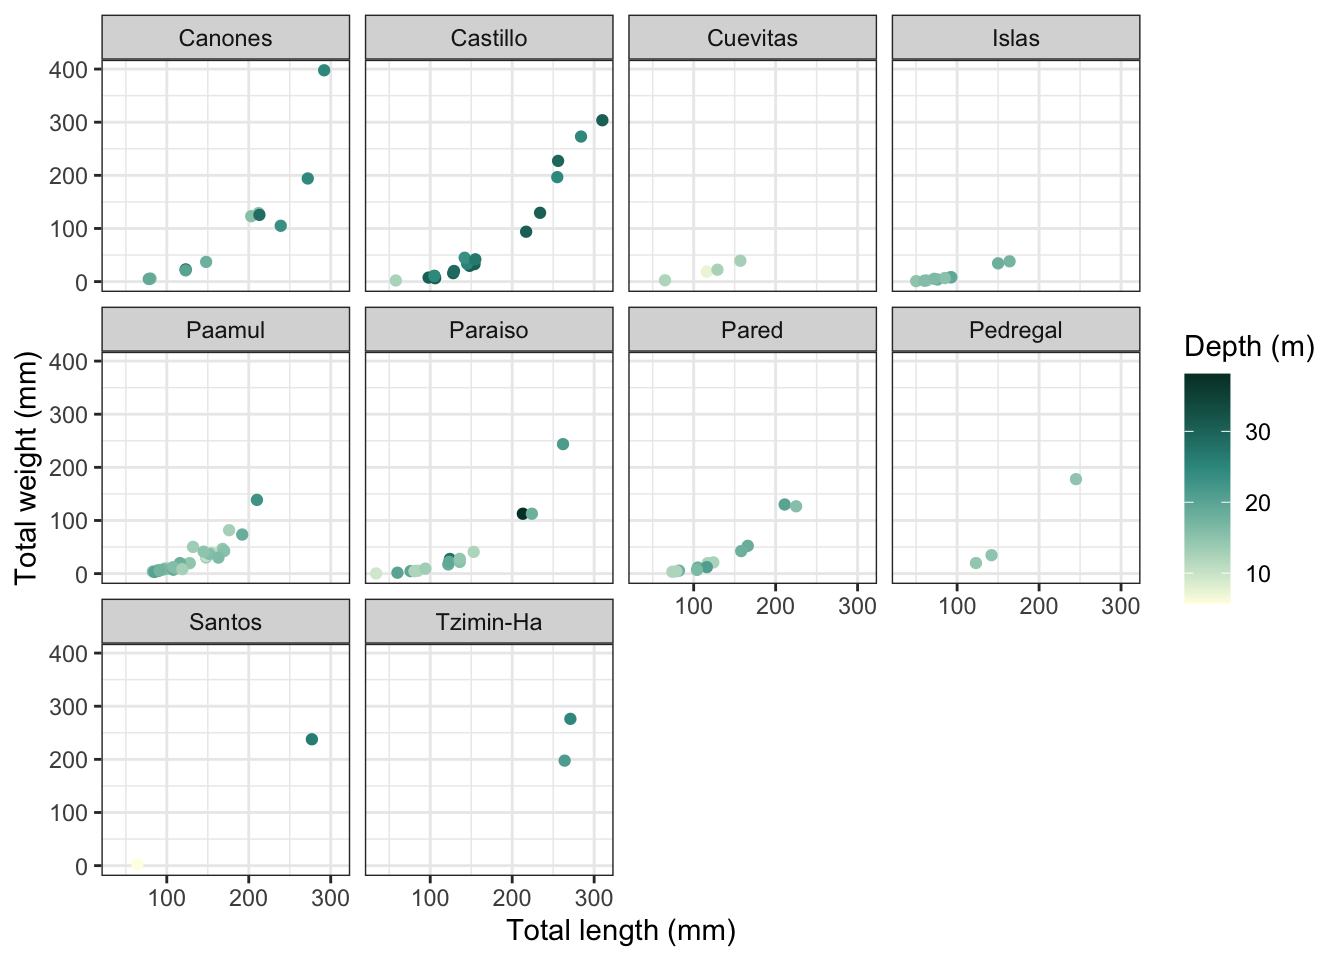
Partner A works on Partner B’s project, and vice versa
dev_your_namedev_your_name into main)